During the past seven weeks I have learned much when it comes to creating maker-inspired lessons for my class. These lesson plans and ideas will come in handy for my class. However, I am left with one final problem. How do I assess lessons based on creativity?
Creativity is not a static idea. It is very fluid. It is different in the minds of each learner.The question we must ask is whether or not we should grade creativity. In the minds of many people to do so would be at the risk of inhibiting student thought. However as Wiggins points out, allowing students to believe that their work is stronger than it is is a disservice to them. Students cannot grow in knowledge if they do not believe that they still have growing left to do. (Wiggins)
Wiggins example of using creativity rubrics in ELA classes is especially poignant for me.I teach writing to the 6th, 7th, and 8th grades at my school. As I have mentioned before, the majority of my learners are ESL and ELL students. As such, it has become easy to focus so much on writing mechanics that creativity has taken a back seat. I need to assess my students not just on mechanics, but on their ability to engage an audience. (Wiggins)
For my class, I am using writing as a process. If you are not familiar with it, it is a method which breaks down the writing process into five steps: Pre-Write, Draft, Revise, Edit, and Publish. This process allows students to create, or make, writing pieces at their own pace. The learning is student driven.
It has been pretty easy to assess mechanics, but to assess creativity will be more difficult. There can be no one standard assessment. It must be different for each assignment and for each portion of the writing process. To assess creativity, we will focus on revise. In revise, students reorganize their ideas and add or delete detail from their writing pieces. This would be the perfect spot to assess creativity.
I agree with Wiggins suggestion that creativity should be referred to as engagement. To assess this aspect, I will have students peer review each others work. Students will be asked to answer several questions about their peer’s work. Some of these questions could be:
1.) What part of this writing interests you?
2.) What would you like to know more about in this writing?
These questions will serve as a way to tell students whether or not their work is engaging their readers. From these assessments and from my own own input on engagement, students will work to revise their ideas into an engaging paper. Using these methods, I hope to incorporate engagement into my rubrics as suggested by Wiggins.
Resources
Wiggins, Grant. (2012). On assessing for creativity: yes you can, and yes you should.
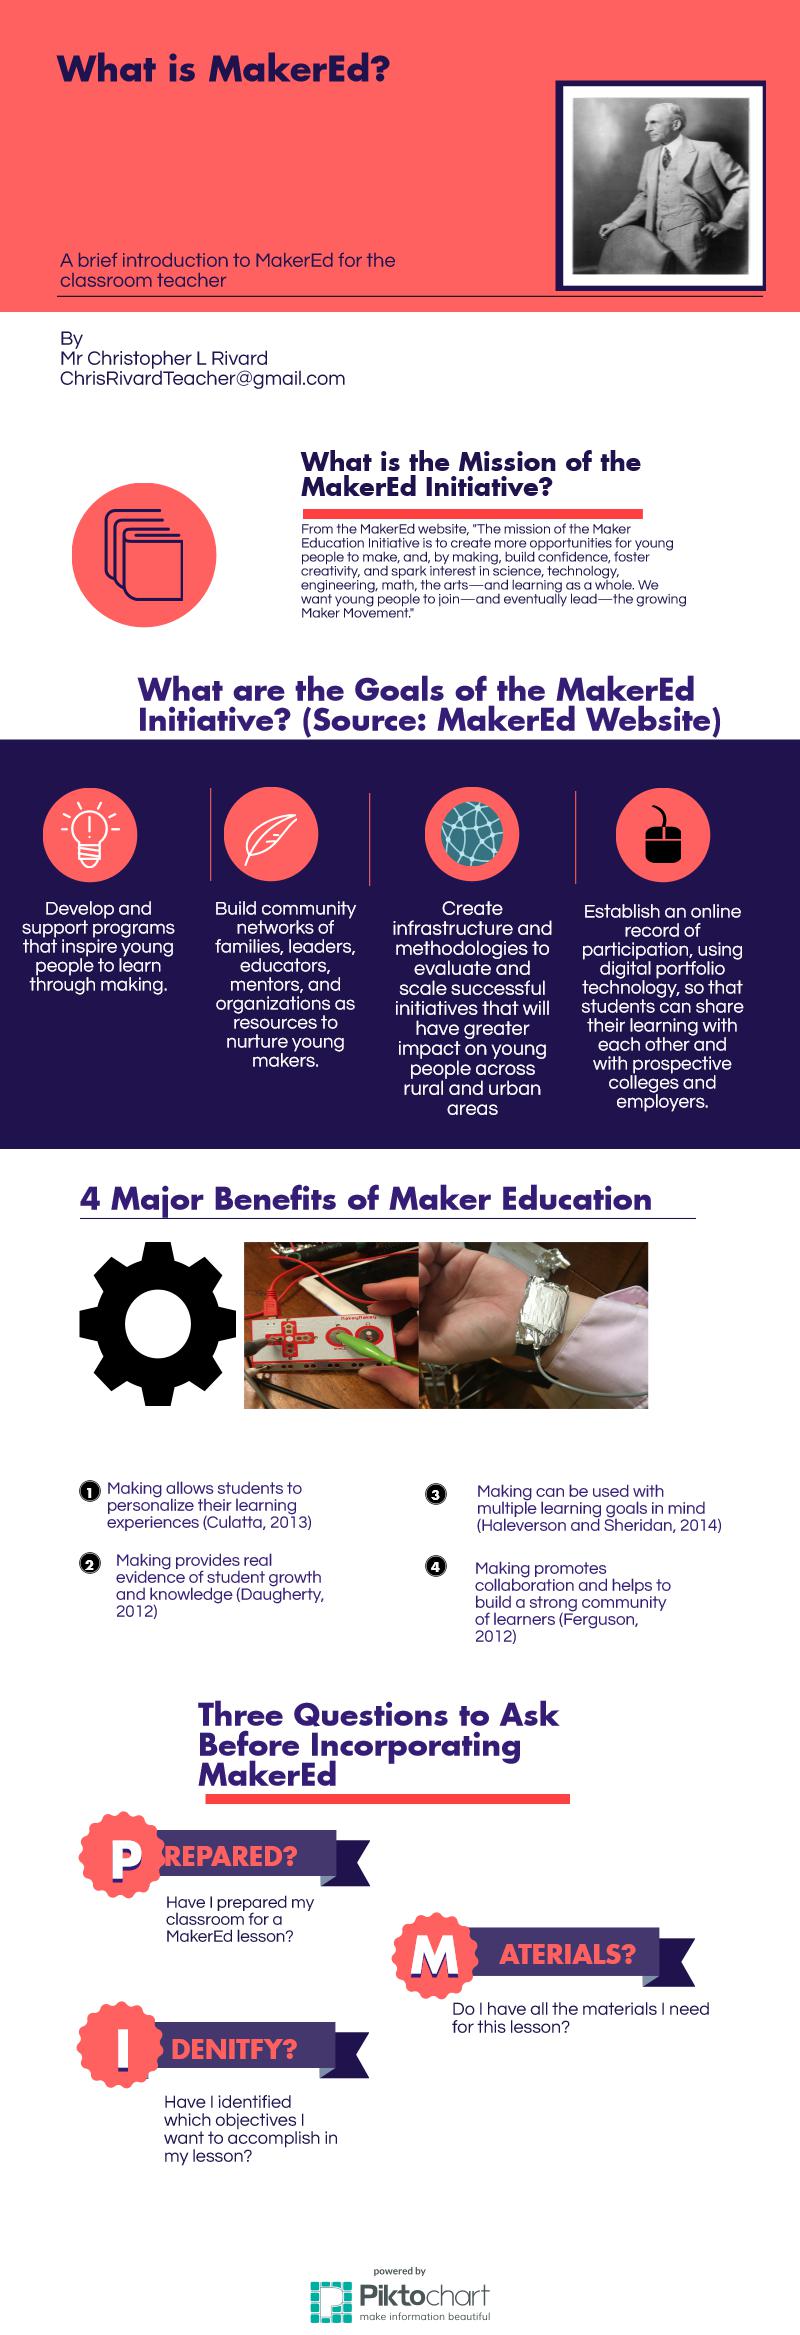
This week I was tasked with making an infographic on Maker Education. As I have been taking this course, I have found that teachers I associate with are unfamiliar with the term “Maker Education”. They do not understand what the mission or the goals of the Maker Education movement are. Furthermore, they have trouble seeing the benefits. For these reasons, I chose to make my infographic an explanation of what Maker Education is. It includes some basic information, the benefits of Maker Education, and some important questions to ask before doing a Maker Education lesson. Without further ado, here is my infographic.
Sources
Culatta, R. (2013). Reimagining Learning: Richard Culatta at TEDxBeaconStreet. TED Talks.
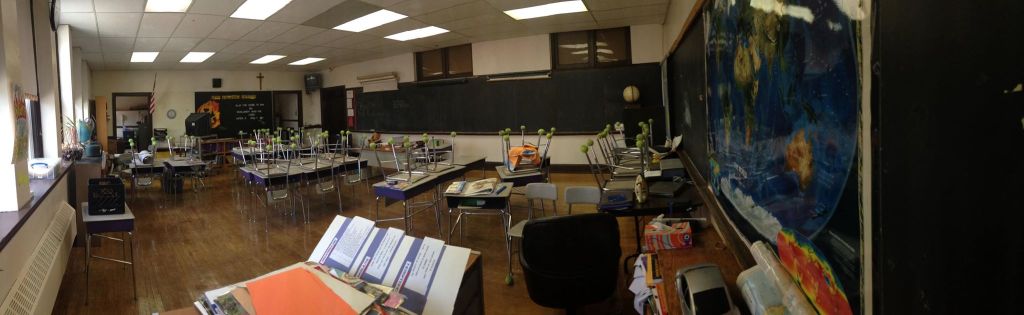
I teach at Holy Redeemer Grade School in Southwest Detroit. It is one of the oldest schools in the city. The building I am in is 116 years old! The age of the building has presented me with some infrastructure issues.
When I entered my room for the first time last year it looked like this.
The front of the room was on the windowed wall opposite me in the photo. My room is 24×40 feet. I rearranged the chairs into a u-shape and kept the front of the room on the longer wall. I added a projector screen and modernized the classroom. I loved this set-up and it worked very well.
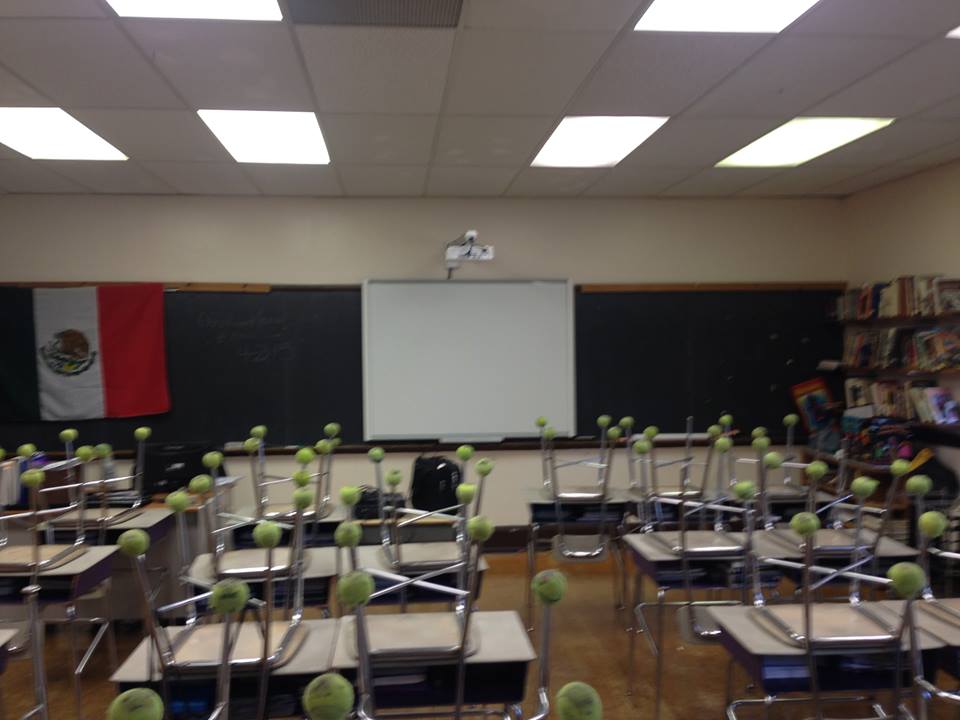
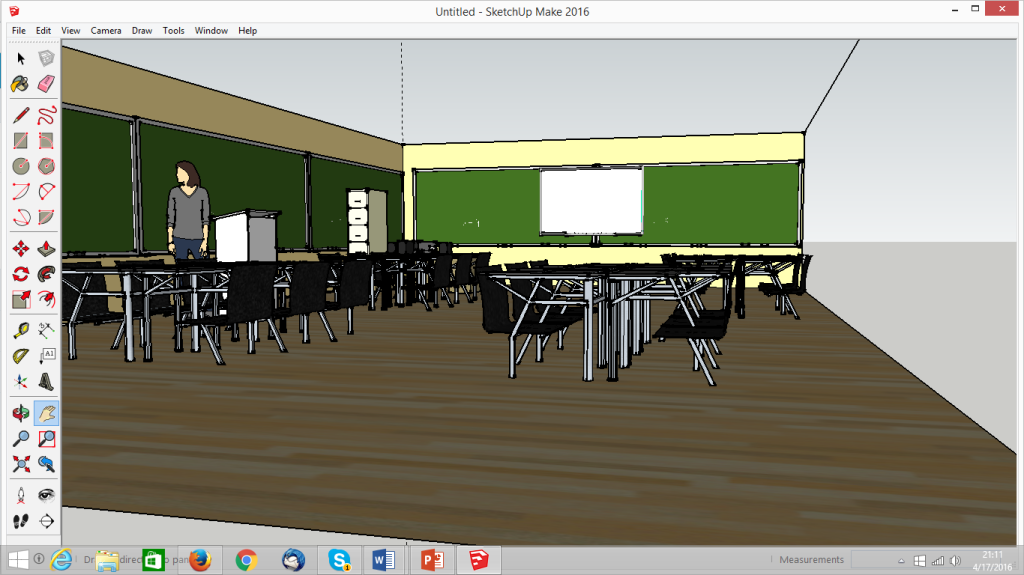
In the spring of 2015 however I was gifted with a SMART Board. I was very excited to use this SMART Board but it presented me with some problems. Due to the windows on the longer wall, I was unable to attach the SMART Board to that wall. On the wall where the cross is, there is now power. The only option I had was to place my SMART Board on the western wall and make that the front of the room. My room transformed into this.
Using rows has proved problematic. As Colleen Lee pointed out, this set-up is teacher focused. It tells students that learning can only come from the teacher.Collaborative learning was an afterthought in this set-up. The students are too separated to work effectively together in teams. Another major problem was the lack of space. All of the desks were jammed in tight. I was not able to walk around freely. The last major problem with rows is that this creates a back of the classroom. My children are not easily able to see over each others heads.
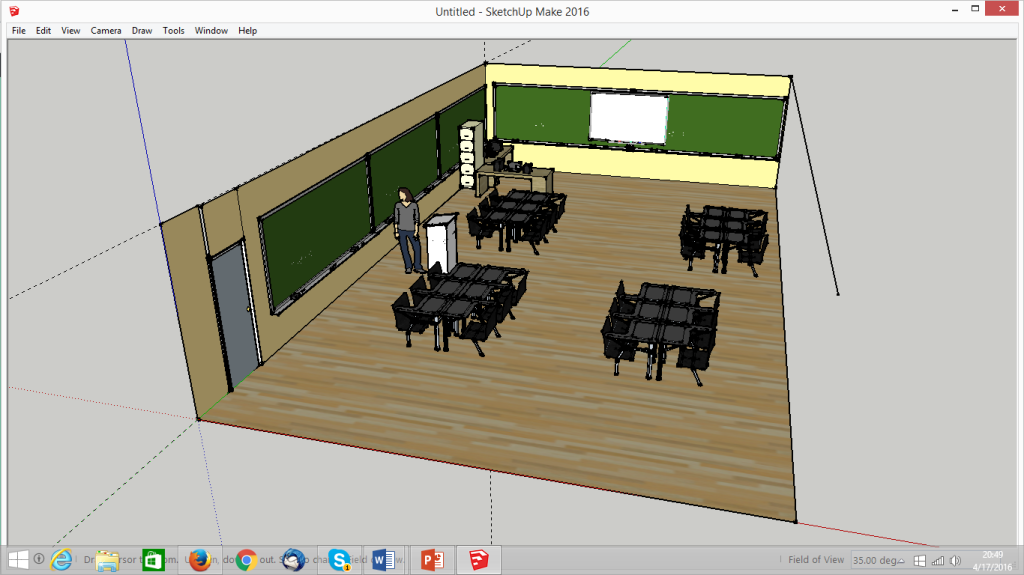
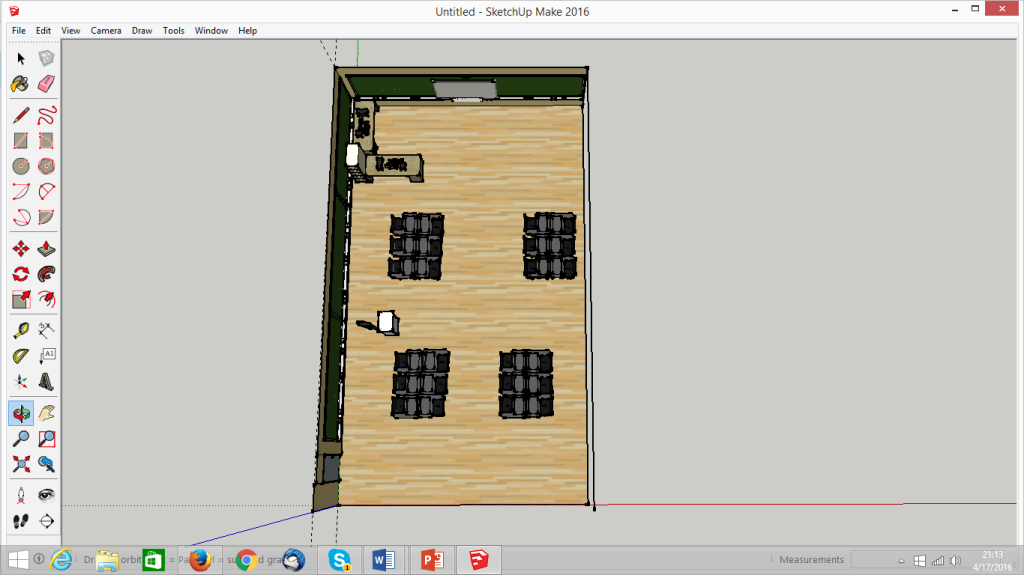
For my Learning Space I want to redesign my classroom with three rules in mind. First, my classroom must have an open floor plan.Second, my classroom must not have a designated front and back of the room. Third, my classroom design will tell students that education is an experience that comes from both the teacher and the student. To incorporate these rules, I came up with the following design in SketchUp.
I have placed all of my desks in pods. As Lee points out, this style of design shifts learning from the teacher to a collaboration between teacher and student. To make sure there was no impaired view, I have made the pods slightly off center of each other.
Arranging these pods off center guarantees a good view of the board for each of my students. This new set up has also created far more walking space, making my room appear larger and more open.
As you can see from the above photo, I have also moved my podium. I have made it so there is no defined front of my room. I can guide the kids in instruction from my podium or go through a multi modal lesson on the SMART board. I also use a wireless keyboard and mouse so that I can use the SMART board from anywhere in the room.
SketchUp gave me the design ideas. I went one step further and actually implemented this design into my classroom. The only resources I really needed were the desks and the wireless keyboard and mouse. Since I had all of these materials, this design cost nothing to implement except time.
To implement this successfully, I waited until Friday afternoon. On Fridays, my kids empty their desks and put their stuff in storage for the weekend. As the desks would be empty, this would be a perfect time to move them around. For twenty minutes after school, I moved the desks around to create these seating pods. The picture below was taken after I moved the chairs but before I moved the podium. Admittedly, I did not have that idea until after I began moving things around.
After one week of use, my design has successfully implemented my three rules.The class is more open, learning is more focused on collaboration between teacher and student, and I have eliminated the idea of a front and back of the room. So far the students have responded well to this change. We will see how this goes through the rest of the year.
Resources
Lee, Colleen. (2014).What Your Classroom Setup May Be Saying to Your Students. School Leadership 2.o.
8-U4.2.2 – The Institution of Slavery– Explain the ideology of the institution of slavery, its policies, and consequences.
8 – U4.2.1 – Comparing Northeast and the South – Compare and contrast the social and economic systems of the Northeast and the South with respect to geography and climate and the development of Race Relations
Standards
Goals/Objectives for this Lesson:
To Understand how the country divided itself when it came to the issue of slavery.
To Understand how the issue of slavery led to the Civil War
Assessment Tools: A quiz will be given at the end of the lesson to determine how much information they retained.
Structure:
Pre-Lesson: Life in the North and South
Students will be asked to read Ch. 14 in the text book for homework. This chapter covers the differences between North and South in the lead up to the Civil War.
Time: 24 hours
Initiation/Opening : Teacher’s Activities
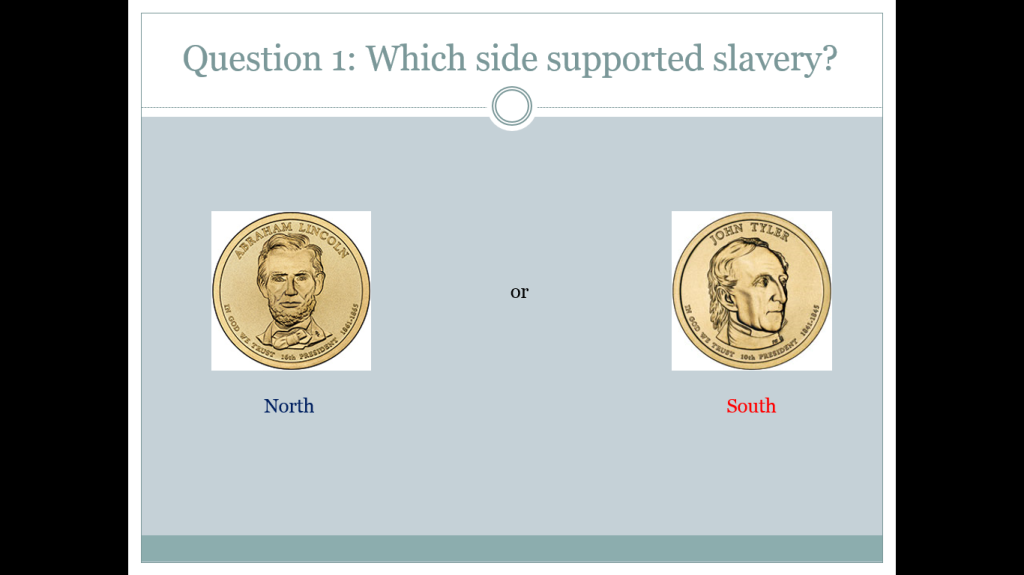
In front of the SMART Board/Projector will be the Makey-Makey Kit, covered up and out of sight. The teacher will use their SMART Board/projector to display two images side by side. A portrait of Abraham Lincoln and a portrait of John Tyler. The teacher will ask the students to identify who these two men are. The teacher will guide the students into realizing that Abraham Lincoln is an embodiment of the North and John Tyler is an embodiment of the South.
Student Activities: Students will identify the two historical figures and discuss what they know about them with the teacher. They will be guided to understanding who each president was more representative of: The North or the South
Time: 20 minutes
Teacher’s Activities: As the students wind down their conversation, the teacher will unveil the Makey-Makey Kit. Attached to the kit will be two presidential coins. Attached to the left arrow will be an Abraham Lincoln coin. Attached to the space bar will be a John Tyler coin. The kit will be attached to a laptop with the website http://makeymakey.com/bongos opened up. Each touch of the coin will make a distinct, unique sound. The teacher will demonstrate which president makes which sound. On the screen there will be a PowerPoint display asking a series of questions with only two answers: North or South. The teacher will ask for a volunteer to come over to the MakeyMakey Kit. The volunteer will wear the Earthband. The teacher will switch out volunteers every few questions. As they answer the questions, the teacher will move forward in the slide show to compare the classes answers to the actual answers. The teacher will lead discussions on why the correct answer is the correct answer.
The student volunteer will poll the rest of the class to decide how to answer each question. The volunteer will answer accordingly. Several volunteers will be utilized in this process. Students will discuss right and wrong answers with the teacher.
Time: 50 Minutes
Closure: The teacher will lead discussions on the answer the students chose. The students will be given a quiz with similar, but not identical questions. The quiz will serve as an exit card The teacher will compare their quiz answers with the answers they gave in class.
Students will take a quiz as an exit card for class.
Time: 20 minutes
Materials needed:
1 Smart Board or Projector
1 Makey-Makey Kit
2 Presidential $1 coins; one of Abraham Lincoln and one of John Tyle
Two computes
One PowerPoint slideshow
25 Quizes
1 Wrist Band
Aluminum Foil
Instructions to be utilized:
Cooperative Learning
Discussion
Rationale for this Lesson Plan:
The purpose of this lesson is to give students a way to physically interact with history and understand symbolism through the use of Presidents Lincoln and Tyler as symbols of the North and South. It is very easy to teach a history lesson using just a PowerPoint. As Culatta points out, this is simply digitizing the old methods of teaching. I seek rather to transform this method into an interactive game.
The students that will experience this lesson are ESL students. Very few of my students have a mastery of the English language. It is hard for them look at words in a textbook or on the board and see meaning. By giving them a visual object in the form of a coin I hope to increase their awareness of history. This idea is based on the Cognitive Theory of Multimedia Learning (CTML) proposed by Richard Mayer. CTML states that words and pictures enter the brain in separate chunks. These chunks then integrate with prior knowledge in the long-term memory to create an idea that learners can remember and recall. This theory was tested on ESL students in Taiwan by Kuo, Yu, and Hsiao. Their research indicates that multi-modal lessons improves the average test scores of their ESL students.
By using these methods I hope to make history come alive for my students. This lesson will serve as a tester for my concept. The coins I am using as buzzers are easy to swap out for other historical objects. I have tested this method out with a few diverse students at lunch time. They have greatly enjoyed it so far. I plan on using this with my class next week and gain a full understanding of the success of this.
References
Kuo, Fang-O, Pao-Ta Yu and Wei-Hung Hsiao. (2013). Develop andEvaluate the Effects of Multimodal Presentation System on Elementary ESL Students. Turkey. Turkish Online Journal of Educational Technology, Volume 12, Number 4.
Mayer, R. E. (2001). Multimedia Learning. New York: Cambridge University Press.
Directions for Creating the Coin Buzzers
Purchase a MakeyMakey
Find a wristband, some aluminum foil and the coins you want to use. For my wristband, I used an old watch.
Wrap the watch in the Aluminum Foil
By doing this, you have successfully created an Earthband.
Connect the MakeyMakey to a laptop by plugging one end of the red USB cable into the MakeyMakey Kit. Plug the other end into a laptop.
Attach one end of an alligator clip to the left arrow key on your Makey Makey. Attach the other end to your first coin. Attach a second alligator clip alligator clip to the space button on your MakeyMakey. Attach the other end to your second coin.
Place the Earthband around your wrist with the aluminum foil touching your veins on the underside of your wrist.Connect an alligator clip to the aluminum foil on your Earth band. Connect the other end of the alligator clip to the part of your MakeyMakey labeled Earth.
Each coin will now make a distinctive sound when pressed. These will serve as buzzers. You are ready to go with the buzzer set.
Directions for Making the Quiz
A Note Before Continuing
Just like all things in education, there is no one way to make this quiz. I have chosen to use Powerpoint as it is a simple system. You may choose to do this differently. Some programs you could use are Prezi, SMART Notebook, or even word itself. These directions will be for Powerpoint.
Find the questions for your quiz. Each question will be multiple choice. The only options will be North or South. Listed below are some example questions you may ask in this quiz.
– Which area of the country supported slavery?
– Which area of the country was more industrialized?
– Which area of the country relied on cotton?
– Which area of the country had more people living in cities than on farms?
– Where was the Democrat party stronger?
Make a PowerPoint. This is a two part step. First, type the question you want ask in one slide. Make sure to include the answer choices.
On the next slide, provide the answer.
Congratulations, you have successfully prepared for this lesson. Goodnight, and Good Luck.
Richard Culatta identified three major problems with education in his TEDX talk. First, educators tend to treat all learners the same despite their own unique needs and challenges. Second, educators will keep the schedule consistent regardless of the length of time that a class requires to learn. Third, the performance data we gather comes too late to be useful to children. One of the solutions offered to these challenges is to implement personalized learning.
Every student learns differently. This is one of the first principles taught in TE-150. It is foolish to think otherwise. Why is it then that we treat all of our classes the exact same? In the post No Child Left Behind world it is easy for an educator to find themselves too focused on test scores. This is especially prominent in private schools.
At a private school, standardized scores can be the determining factor in whether or not parents trust a school with the education of their children. A private school the writer of this blog previously worked at emphasized test scores above all else. In the months leading up to the IOWA test, educators were supposed to prep for the test while still covering the curriculum. As time was an issue, lessons were moved through very fast. Students were left behind and teachers were too pressed for time to personalize their learning experience. As a rookie teacher, it was very overwhelming. Sam Redding offers a solution to this problem.
In his article Through the Student’s Eyes: A Perspective on Personalized Learning and Practice Guide for Teachers, Sam Redding offers solutions and guides. Redding argues that the personal aspirations and self-efficacy perceptions of a student drive their motivation to learn. The words and actions of a teacher decide how receptive students can and will be. Therefore, it is up to the teacher to use their words and actions in a personalized way to reach each student. Setting individual goals for the students helps them to take ownership. To achieve these ends, Redding has created several lesson planning templates to use in the classroom. These templates are simple and allow a teacher to easily personalize their lesson plans. By guiding the teacher to achieving personalization, Redding has given relief to the overwhelmed teacher. (Redding 2013)
While Redding supports personalized learning, he does not advocate using technology in the classroom. Redding believes that an over reliance on technology can be problematic for a student. While he offers many helpful solutions to educators, Redding is also an example of the learning divide that Culatta identified. In his writing, Redding believes that technology should only be used as a complementary aid, not as a main teaching tool. In this way, Redding seems to only digitize education, not reimagine it. (Redding 2013)
In order to re-imagine learning, we must adapt technology for the needs of the individual student while keeping the overall class goal in mind. Re-imagining is not necessarily easy. In Assembling Learning Objects for Personalized Learning: An AI Planning Perspective, Antonio Garrido and Eva Onaindia examine the process a teacher must follow to successfully re-imagine personalized learning for the computer. Garrido and Onaindia argue that the tools to develop a course are not hard to find. However, they feel that these tools are rarely suited to be reused and must be unique to every situation. In order to personalize e-learning, the educator must first identify which learning objective they want to achieve. From there, the educator can develop several different education paths for a student to follow. Garrido and Onaindia believe that is acceptable for a teacher to begin with one program from the class and then slowly change it to match the needs of the individual students. They offer their own methods and ideas on how to do this in their guide. (Garrido and Onaindia 2013)
Using these two guides, teachers can begin to adapt their classroom for personalized learning. By breaking down the problems and offering simple guides and solutions, these academic papers allow educators to begin to overcome the learning divide in technology. As teachers become more comfortable with re-imagining technology, personalized learning can be used to overcome the problems identified by Richard Cullata.
By reading these articles, one should realize that personalized learning is not an impossible goal. More importantly, there is no one approach to personalized learning. Redding, Garrido, and Onaindia are makers. They each took the concept of personalized learning and transformed it for the environments they teach in.While these guides can be used to help a teacher adapt their curriculum to personalized learning, they should not be regarded as the absolute end of transformation. As a maker, educators must continue to transform the ideas of others in order to make it fit in their classroom with their kids. As long as we practice transformation, we can not only bring these new ideas into our classroom, we can make them work. The questions is, will you continue practicing transformation? Will you remix personalized learning into your own teaching style? Will you instead just digitize the learning? The choice is yours.
References:
Garido, Antonia and Eva Onaindia. (2013). Assembling Learning Objects for Personalized Learning: An AI Planning Perspective. IEEE intelligent systems, Volume 28, Issue 2. Retrieved from Serial Solutions
Redding, Sam. (2013). Through the Student’s Eyes: A Perspective on Personalized Learning and Practice Guide for Teachers. Center on Innovations in Learning, Temple University. Retrieved from ERIC
When I first received the MakeyMakey Kit I began to think of how I could use that in the classroom. My thought immediately turned to classroom trivia. I have had my students play a Jeopardy style game for the past four year in order to help them study for tests. For this, I have used the Classroom Jeopardy Set offered by Educational Insights. At my previous school and my internship, it was readily available for use. At the current school, I had to buy one. Unfortunately, a new set costs upwards of $600 dollars! I did the sensible thing and bought an older version for around $50 instead.
This version has had several problems. Mainly, it is notoriously not user friendly. Typing up questions is quite a chore. It can take several hours. As a teacher working four jobs and going to grad school I don’t necessarily have the time to devote to that. I have used it on some occasions.
On some occasions I have opted instead just to use a more traditional and time friendly PowerPoint based Jeopardy game. This too has problems. Mainly, it is hard to tell which students raised their hands first. Students will of course argue about this too and slow down the process. If I could make my own buzzer, I could solve this problem. For this prototype, I have chosen to create a simple buzzer system. The buzzers will consist of two found items making unique and noticeable sounds. These will be used by competing teams in my classroom for a game of classroom Jeopardy.
Using Found Items
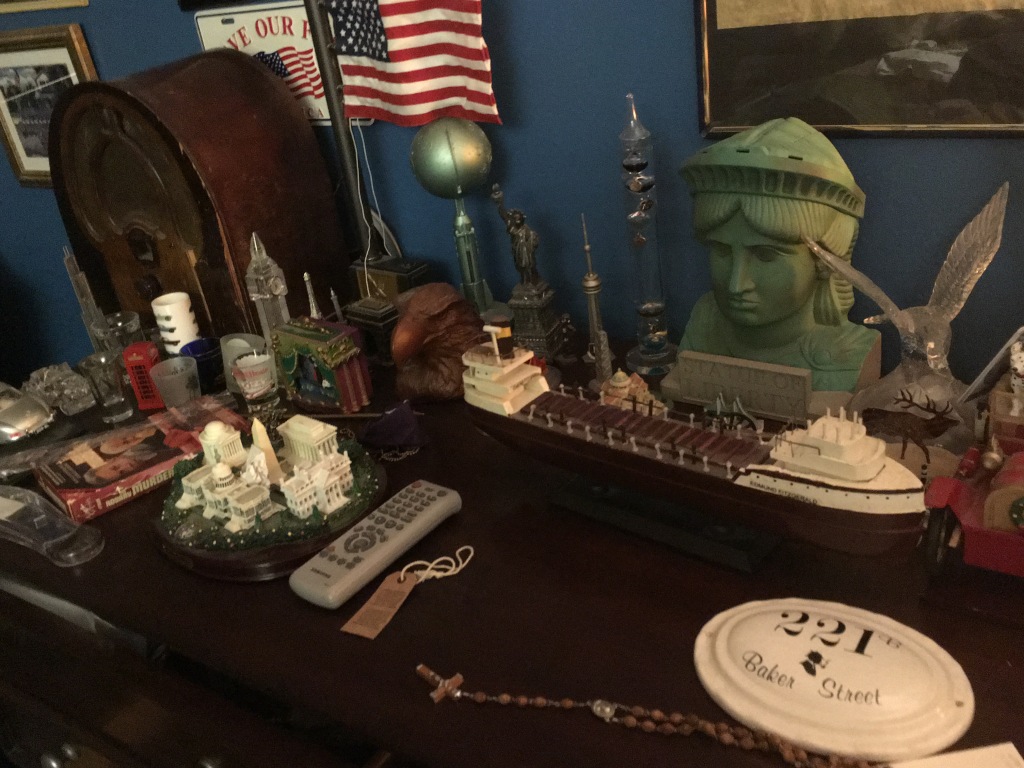
I am a frequent visitor to thrift shops, antique stores, and garage sales. I also spend far, far too much time on Ebay. I collect historical and cultural items from across history. From this collection of memorabilia is where I chose to find materials to use in my buzzer project. You can view the picture below to see some of the items I have gathered over the years.
That’s just one small area of the memorabilia I’ve collected over the years. There is a lot more, but I’m afraid I don’t want to show those due to how messy it is!
From my collection of thrift items, I grabbed the following to use.
Adapting My Items for Usage
Of these items, few of them worked. Big Boy and Lady Liberty allowed no electricity to flow whatsoever. The campaign buttons would not work by pressing on the front. The watch similarly did not work well. The coins are the only items that worked right away.
While the coins were functional, I did not want to necessarily use them. I very much wanted to use the buttons. I came up with a solution: Wrap the backs of the buttons in aluminum foil. This allowed the electricity to flow while maintaining the unique image of each button. Take a closer look and you can see how I did that with these two buttons.
The other thing I decided to adapt for usage was the earth link cable. In order for MakeyMakey to work, you need to be holding on to an alligator clip that is hooked in to the Earth portion of the controller. I found this uncomfortable and chose to adapt the watch into an Earth band. I wrapped it in aluminum foil and wore it under my wrist like so.
This allowed me to be in contact with the earth wire comfortably. As a bonus, it is also easy to put on and remove from and student using the MakeyMakey. One very important thing that I noticed is that this will not work unless the aluminum foil is in contact with your vein. That is why the watch is worn underneath my wrist instead of above like normal.
For a more detailed look at how I experimented with MakeyMakey, please visit my public Evernote Workbook.
Finding the Buzzer Noises
This is where my prototype needs the most work. Right now I have found a very simple solution using the MakeyMakey test site. The test site allows you to play two different notes on a set of bongo drums. The bongo drums each play very distinct notes and light up the screen in different locations. Using this site, I am able to create an easy simple buzzer for a two person game of trivia. The site can be found here.
How to Build it
Materials Needed:
A MakeyMakey Kit
One Wristband
Aluminum Foil
Two Campaign Buttons or Two Coins to use as Buzzers
A Computer with an internet connection
PowerPoint
Instructions for setting up the MakeyMakey:
Gather all the needed materials.
Open the MakeyMakey Kit. Find the orange cord and the MakeyMakey Control Board.
Plug the orange cord into the back of the Control Board. Plug the other end into your computer.
Take your wristband and wrap in Aluminum foil. I used an old watch for this part.
Take an alligator clip and attach one end to the Aluminum Foil. Attach the other to the slot labeled Earth on your Control Board.
Instructions for Using Coins as the Buzzers
Attach an alligator clip to the coin you wish to use. Attach the other end to the Control Board in the area labeled space.
Attach a second alligator clip to the second coin. Attach the other end to the arrow point left on the Control Board
Instructions for Using Campaign Buttons as the Buzzers
Take the precaution of corking old pins. Modern pins have safety backs. Older pins do not. I have found that using an eraser from a broken mechanical pencil worked well for this.
Cover the back of your campaign pins with aluminum foil. The pins themselves do not allow electricity to flow. Make sure that the foil slightly overlaps the front of the pin.
Attach one end of an alligator clip to the aluminum foil. Attach the other end to the area labeled as space on the Control Board.
Attach one end of an alligator clip to the aluminum foil on the remaining button.Attach the other end to left arrow on the Control Board.
Instructions for Use
Place the wristband on your wrist. Make sure that the aluminum foil is located under your wrist. It will not work if it is located above your wrist.
Use your buttons or coins to make the bongos play. Be aware that the player must touch the foil if you are using campaign buttons.
You will notice that each buzzer makes a noticeable and distinct sound. It will also light up the screen in different locations.
Left Buzzer
Space Buzzer
As you can see, it is very easy to tell which buzzer is which.
Divide your class into two groups and assign people to control the buzzer.
Begin to ask trivia questions. Each team will be able to buzz in. You will know who buzzed first by the sound and the lighting pattern on the screen.
Lastly, I’ve included video instructions as well as a small clip of this device in action below. Please check it out.
How the Prototype Can Be Used Currently
Right now, the prototype is pretty simple. My purpose with this prototype is to use it in a game of classroom Jeopardy using the templates found at this site. This can also be used in other ways.
As you saw in the picture above, I had campaign buttons from George W. Bush and Richard Nixon. Campaign buttons are very cheap and easy to get a hold of. With the election year coming up, you could use campaign buttons from the current election. You could create a simple PowerPoint with the election issues and have students click the candidate who stands for this issues. It will teach students the differences between the political parties and the candidates themselves.
This compare and contrast option can be used with virtually anything. Below you will see a picture of a British Pound and a Mexican 10 Peso piece. You could use these as buzzers and ask students questions comparing the countries. The students can then click on the right coin for each country to give their answer.
The Future of This Prototype
I have begun the process of transforming everyday objects into educational objects. As with all transformations, there is a lot more work to do before I am satisfied with it.Right now, I have given you the ability to make a simple buzzer to use with a PowerPoint game. As I experiment more with this content, I intend to create my own trivia game that incorporates multiple homemade buzzers into it. That is the future of this prototype. If you have any suggestions on sites or software to do this with, please do not hesitate to let me know.
On a Separate Note
People learn in different ways. Some people learn best with visual examples. Including visual images and videos allows people to see how creations are put together, not just read it. By including written directions, I am also addressing the instructions to the people who learn by reading. Combining these two forms together allows this blog post to reach a wider audience.
I have always been fascinated by innovation. I’ve even spent the last ten years working at the Henry Ford, a museum and outdoor village dedicated entirely to innovation. It struck me as I watched Everything is a Remix how the innovators I grew up with were actually makers. People like Henry Ford and Thomas Edison did not create original ideas. Instead they took existing ideas and transformed them into something better.
I chose to base my WeVideo on this idea of transformation. Originally, I was going to heavily feature the Lumiere brothers and their films. After I had spent about two hours remixing Arrival of a Train at La Ciotat, I discovered the common usage license I had been using was incorrect. Under French Law, the author has copyright protection for 70 years after his death. As it turns out, the Lumiere brothers will still have their copyright until 2018. My first video was shot and it gave me a valuable lesson. Don’t use videos unless you are 100% positive they are in the public domain.
After that, I decided to focus on my hometown legend, Henry Ford. He didn’t invent anything, he simply transformed ideas into a way that made the car a part of our every day lives. He was a maker. His ideas changed our world and inspired other makers to create businesses and industries modeled after the car. A whole new world was created by these makers.
I spent several hours remixing public domain videos and images. I came out with my first attempt and I was proud of it. It was my first video after all. After I watched it a few times, I realized it wasn’t very good. My first draft (Found Here) came to a jarring halt in several places and just didn’t seem to link the ideas all that well. Despite spending all that time working on it, I decided to scrap it and start anew.
I took what I had learned from two failure and I transformed my ideas into my final video. I present to you A World Made by Makers 2.0, a Chris Rivard Presentation.
Vocational Guidance Films, Inc. (1940). Automotive Service (Educational Film). USA: Burton Holmes Films, Inc. Retrieved from https://archive.org/details/Automoti1940
I am proud to say that I have been on the internet since 1999. In my elementary school, my class was the first to have mandated computer classes. I grew up with the rise of the PC in the 90s and the 2000s. When I was about 12 years old I began designing web forums and running websites. I became an expert in phpBB2.
Around 14, I stopped working on websites. I devoted my time elsewhere and gradually forgot what I had learned. I have not attempted to build a website since. The internet has grown and website building has become easier than ever. However I am out of practice and am still re-developing my skills. This blog is a testament to that. As I become more accustomed to it, I will update and redesign this blog to be more in keeping with a professional website.
Until then, this site will represent the only real season we have here in Michigan: Construction.


